How to build tables for SCALE-UP classrooms
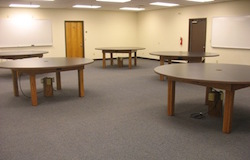
Here are instructions for building 7-foot diameter round tables for use in SCALE-UP classrooms, where students spend the majority of their time working in small groups on interesting projects. These tables are the ideal size and shape for large SCALE-UP classrooms, according to the developer of SCALE-UP, and can comfortably seat 3 groups of 3 students at each table. Using these plans, you can build tables for about $450 each, less than a third of what you should expect to pay commercially.
Tops are 3/4" plywood, stacked in two layers, with laminate on top, 4" hole in the center. The bases are 1x4 white oak. We put outlet boxes in each of the 4 faces of the base, to be used for power supplies, etc. The dots you see on the underside of the top are screws to hold the double-stack together. One problem we have found long-term is that the laminate shrinks and leaves a gap about 1/16". The tables are still functional, but students will start to pull on the laminate.
 Table dimensions:
- 7 ft. diameter X 30 in.
Tools Needed:
- 1 hp. Router w/2in. flush cut bit/3 X 24 Belt Sander/Drill/Planer/Table saw
- 4 in. Hole saw
- (laminate trimmer?)
Materials Needed (per table):
- Several 1 in. screws - $5.00
- Several 1 ½ in. screws
- (16) 3 in. screws - $5.00
- (2) 4 X 8 X ¾ sandply - $77.86
- (2) 4 X 8 X ½ sandply – $58.14
- (2) 4 X 8 sheets of formica - $105.60
- Glue for formica & wood - $10.00
- 16 ft. of ¾ X 6 in. Oak - $33.88
- 56 ft. of ¾ X 4 in. Oak - $87.36
- 16 ft. of ¾ X 1 in. popular - $5.00
- Electrical - $40.00
Total Cost per table:
- $427.84
Instructions:
TOP:
Begin by laying out the two 4 X 8 X ¾ in. sheets side by side and using a plate jointer and cutting the spot for (4) #20 biscuits and joining together. Place the two 4 X 8 X ½ sheets across the joints (perpendicularly) of the pieces of ¾, gluing them down and then screwing with the 1 in. screws inside & outside of a 7 ft. diameter circle. Don’t put any screws within a 3 inch radius of the center. After this has dried for 24 hours, mark the center of the 8ft. square and using a 3 ½ ft. stick mark your circle and drill a ¾ in. hole on the outer edge so you can start your router. Next build a jig out of wood (this wood has to be 4 ½ ft. long and larger than your router base) then cut your 7 ft. circle. Make 2 or 3 passes and go slowly so that you don’t burn up the router! Use the hole saw to cut a 4” hole in the center, if desired.
The next steps can be done before or after attaching the top to the base: Cover the top with laminate, trim, and bevel the edges. Finish edges with stain, varnish, or paint as desired.
LEGS:
For the legs, just cut your ¾ X 4 in. oak lumber into 30 in. lengths. Laminate 5 pieces together with wood glue. Let these dry for 24 hrs. and run thru plane to size correctly (if you want square legs). You can sand the edges for a nice shape.
BASE:
 Cut the ¾ X 6 lumber and the 1 X ¾ in. popular into four 4 ft. lengths. Glue the poplar strips down the side of 6 in. oak pieces to form a profile of an “L” with the ¾” side of the poplar glued to the oak. The view given is looking at the ends of the strips. The poplar will be screwed into the top, so the view here has the base upside-down.
After these are dry, use the legs to mark how much of the poplar strips to trim. Then glue the four oak/poplar pieces into a rectangular base. The poplar strips will be on the inside of the base. After all is dry , place the legs in the corners of the base (where you shortened the poplar strips) and screw with the 3 in. screws. If you want, cut in electrical boxes (for occasional power supplies) and wire. Bases and legs can be stained and finished as desired.
ATTACHMENT:
Center the tops on the bases and attach by using 1 ½” screws tilted slightly running through the poplar into the top; it’s a good idea to drill pilot holes. This is probably a good reason to wait until after assembly to laminate the top. Also, we put the seam between the 4x8 sheets running diagonally across the base. You will have to disassemble the tables to get them in and out of rooms with standard doors.
 Add a Comment