Magnification
Variant i Dynamics first
This tutorial is the sixth in the sequence on geometrical optics. The emphasis is on helping students interpret ray diagrams in the context of lateral and angular magnification.
Topics Waves and optics / Geometrical optics: models, light (or shadow), ray tracing, and geometrical optics
Materials
Materials by the UW team
- Instructor Guide


- Pretest
- Exam Questions

- Equipment List
Tutorial details
The tutorial begins by having students consider a diagram of two objects that lie on a table. Students come to recognize that the apparent size of the object depends not only on its size but also on its distance from the observer. They are also led to note that the angle subtended by an object can be used as a measure of its apparent size.
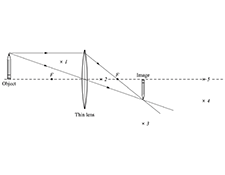
The second part of the tutorial is in the context of lenses. Students are led to recognize that knowing the relative sizes of an image and an object is not sufficient to determine whether the image or the object (without the lens) will appear larger to an observer. Students are given practice in relating ray diagrams to what an observer sees in a lens. For example, they are shown a diagram and asked whether an observer at each of the labeled points could see a sharp image of the pencil tip (not the actual pencil tip itself). (See MGF Instructor Guide Fig 2.) Some students incorrectly predict that observers at points 2, 3, and 5 will be able to see an image of the pencil tip even though none of the light that forms the image reaches these points. To answer this question, students must be able to interpret what is meant by the terms image and image location. Finally, students come to recognize that for an observer at point 4, the image appears larger than the object (as viewed without the lens) even though the image is actually smaller than the object.
In the third section of the tutorial, students apply what they have learned thus far to a magnifying lens. They come to recognize the standard use of a magnifying lens is to make an object appear larger, but not closer.
Lateral and angular magnification are defined in the final part of the tutorial. By considering the values of these quantities in the different situations described in the tutorial, students distinguish between the two types of magnification.
For instruction tips, login or register as a verified educator to see the Instructor Guide.
Prerequisites
Prerequisite tutorials
The Convex lenses tutorial is a prerequisite to Magnification.
Other prerequisites
Students should have worked through the tutorial Convex lenses. The pretest uses the terms lateral and angular magnification. These terms should have been briefly introduced to students.
Equipment
List
- white board or large sheet of paper with markers
- convex lenses of focal length between 50 mm and 150 mm (exact value unimportant)
- cardboard tubes (e.g. empty toilet paper rolls)
- cans (e.g. empty soda cans)
Coming Soon! We hope to release the discussion section on each tutorial soon.