Best practices for whiteboarding in the physics classroom
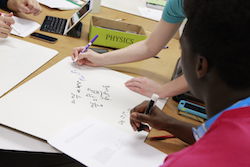
Whiteboards are an indispensable tool that physicists use to work out ideas individually and collaboratively, and to present those ideas, both for public discussion and critique of tentative ideas and for communication of more fully formed ideas. If you walked into a science faculty’s office and did not see a whiteboard, it would feel like something was missing (this is not true in other disciplines). Whiteboarding is also a valuable pedagogical tool for students in physics classrooms. It is an integral part of research-based teaching methods in such as SCALE-UP, Modeling Instruction, and Student-Generated Scientific Inquiry, or can be used as a stand-alone approach without adopting other parts of these methods. In this recommendation, we offer guidance for how to use whiteboarding effectively in your classroom.
Goals of whiteboarding
Whiteboarding allows both practicing physicists and students to:
- Collaboratively or individually work out ideas
- Make ideas public so that peers can learn from them and provide feedback on them
In the physics classroom, whiteboarding also serves an additional function:
- Make student ideas visible to the instructor so that the instructor can understand and provide feedback on them
What is whiteboarding?
Whiteboarding is a pedagogical approach in which students use whiteboards to work out and share ideas. In teaching methods like Modeling Instruction for high school and university classes, SCALE-UP, or Paradigms in Physics, teachers usually give the students a problem, and the goal of the activity is for the students solve the problem and reach consensus on the correct answer. In teaching methods like Student-Generated Scientific Inquiry or Energy Project, students are more likely to generate their own problems, with the goal of creating their own representations and/or scientific models. In either case, whiteboarding activities usually have two parts:
- Working out the problem: Students are given (or invent) a challenging conceptual problem to work out on a whiteboard either in small groups or individually. Because the whiteboard is temporary, non-committal, and easy to change, students have the opportunity to test out tentative ideas in a low-stakes environment. The instructor can get a good sense of how students are thinking about the problem by walking around the room and scanning the whiteboards.
- Presenting the solution: After each group or individual has worked out the problem, there is usually a process in which a few or all groups share their work with the whole class, either at the front of the class or in a large circle, with peers and/or instructors asking questions to help clarify and refine their ideas. Alternatively, students can share their ideas with each other through a “gallery walk” in which students walk around the room and look at at discuss each other’s whiteboards.
Diagram key:

Approaches to working out the problem
When designing a whiteboarding activity for the classroom, there are several considerations to make about how you want to format the activity and the goals that you have for that particular whiteboarding session.
-
Group size: Working in small groups vs. as individuals? In a small group activity, students will collaboratively work on a single whiteboard in groups of 2-4. This format is good for encouraging communication, for distributing expertise within the classroom, and for large class sizes where instructors cannot easily interact with each individual student. Furthermore, a small group of students can often tackle a more challenging problem than when working by themselves. However, small group work typically takes up more classroom time as you may need to allow for discussion, and the instructors have to monitor groups to make sure all members are contributing. Teaching methods like SCALE-UP and Modeling Instruction use small group activities almost exclusively. In contrast, Paradigms in Physics has students working at their own individual whiteboards. This allows instructors to see what each student is thinking and help students on an individual basis.
.png)
.png)
-
Sources of Problems: Giving problems vs. inventing problems? Instructors have to choose whether they want to give students pre-written problems (like a homework set or worksheet) to solve on their whiteboards, or if they want students use their whiteboards to brainstorm ideas, come up with problems, or develop a new representation. In Student-Generated Scientific Inquiry students are often asked to invent problems, such as in this lesson plan from the Composing Science project for an activity in which students invent diagrams for describing physical phenomena, and then use peer feedback to help refine their representations and make them more effective for achieving specific goals. “By giving students the authority to develop their own representations and establish requirements for these,” this activity helps students “see modeling and diagramming as a sense-making activity… rather than meeting seemingly arbitrary requirements set by the instructor.” In contrast, SCALE-UP and Modeling Instruction often have students working through problem sets and creating “solution boards” to show their work and understanding of the problem.
%20Problem.png)
%20Problem.png)
-
Variations in what students are working on: Same problem vs. different problems? Having students (or groups) work on the same problem (or invent a diagram for the same concept) allows students to directly compare their results to their peers’. This method lends itself well to a compare/contrast discussion of students’ solutions as students have a common understanding of the problem (or diagrammatic) context, and this method can highlight the variety of solution paths that students took. Having students (or groups) work on all different problems allows for students to see a large number of situations or problem contexts in a short amount of time. This divide-and-conquer technique, also known as a “jigsaw” activity, has each student (or group) act as the “authority” on their particular question. This method lends itself well to a compare/contrast discussion of the different types of problems and can also be used for a consensus discussion about what is common among the problems.
 Problem.png)
 Problem.png)
-
Theory vs. experiment? Whiteboarding can be used in either paper-and-pencil, theoretical problem contexts or experimental, data-driven problem contexts (or both!). In theoretical contexts, students are working on creating solutions, brainstorming problems, or developing diagrams on their whiteboards. Alternatively, whiteboards can also be used in the experimental process to record and synthesize data, create graphs, discover trends in data, and develop explanations for the patterns that students are seeing. Whiteboards can be used in both theoretical and experimental activities, which often feed into one another.
.png)
.png)
Approaches to presenting the solution
Just like there are many ways to design a whiteboarding activity, there are many ways to have students present their solutions. It is important to recognize that while we often ask students to present their work to each other or the whole class, they’re still working out ideas at this stage. Some examples of ways to present student work include:
 Board meeting: This is a common technique from Modeling Instruction for high school and university classes, and board meetings are a significant part of the discourse in a modeling class. In a board meeting, students gather in a circle and bring their whiteboards with them. They can then present their solutions to one another, critique each other’s work, ask questions to the group (about their process, concepts, definitions, etc.), and share any difficulties they ran into while working on the activity. Ideally the board meetings would be student-led, with students both asking and answering questions. The role of the instructor is then to guide this discussion and propose questions to the group of students that they may have missed or not emphasized. Board meetings lend themselves well to consensus building and allow for a lot of flexibility in the discussion.
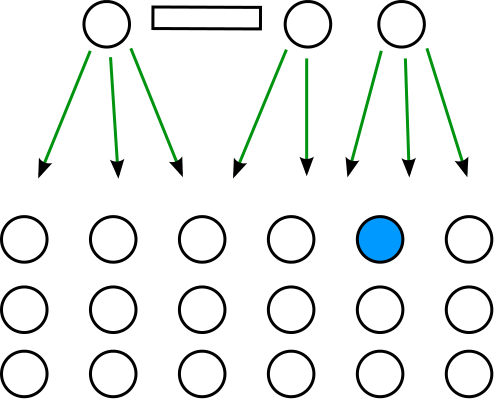 Front-of-class presentation: Rather than having a board meeting, students (or groups) can present their boards at the front of the classroom. This is particularly useful if your classroom has permanent seats that you cannot move into a circle discussion. Students can present complete solutions or tentative ideas at the front of the class and receive feedback from their peers. Because of the format (addressing the whole class from the front of the room), this may be a high-risk situation for students, but it can also help students become more comfortable with presenting their ideas.
 Viking council: In a viking council (the name is from Donna Messina at the University of Washington), the instructor first has students work out a single problem in groups (or as individuals) on a whiteboard. After coming to some conclusion as a group or by themselves, the instructor then pairs groups (or individuals) who had conflicting ideas or solutions. The groups (or individuals) present their work and ideas to each other, supporting their ideas with evidence and trying to persuade the other group why their solution is correct. The goal of the viking council can be to have groups come to consensus on a problem or identify why their solutions are different (perhaps the groups made different assumptions about the problem). This type of presentation works best when there are multiple, conflicting ideas to be discussed. A viking council may be used when consensus is needed in the class, but mobility or time is limited.
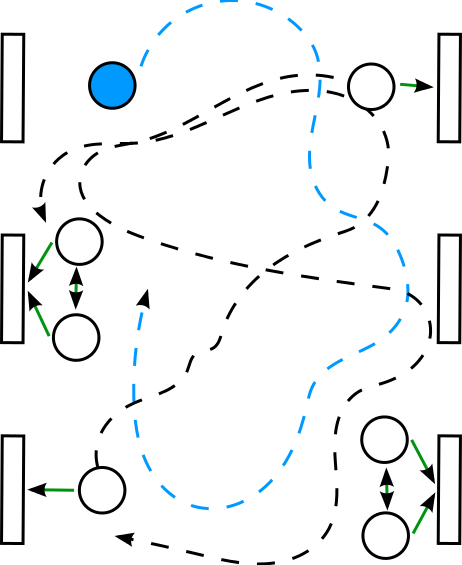 Gallery walk: A gallery walk creates a display of student work around the classroom by placing student boards around the classroom when they are finished with their solutions. Toward the end of class, students are encouraged to take a walk around the “gallery” to see how their peers solved the problems and how those compared to their own solutions. This method highlights the variety of students work and can be a good way to showcase many different problems in a short amount of time. Since a gallery walk typically does not include a whole-class discussion, it is better used for practice problems rather than introducing content.
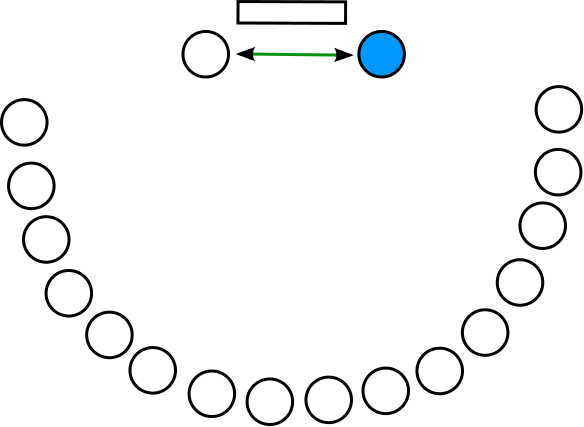 Master class: A master class, described in this lesson plan from the Composing Science project, is modeled on a technique used regularly in music instruction, in which an instructor works with an individual student working out an idea at a whiteboard in front of the class, in order to illustrate how to give and receive feedback. By observing an example conversation between an instructor and student, the rest of the class can learn and apply those ideas in their own peer-to-peer conversations. A master class is good for addressing a common problem in the class through an example (either in content or classroom norms).
Addressing Common Challenges in Whiteboarding
Whiteboarding may initially be uncomfortable and confusing for students (and teachers!) who have never done it before, and challenges are likely to arise, especially early in the term. Most of these challenges will come up at the beginning of the semester, and can be addressed by establishing and maintaining appropriate classroom norms. Some of these challenges will go away once the classroom culture is established and becomes normal, and others will require regular monitoring and reminders.
- What if students are initially reluctant to write tentative ideas on whiteboards? Once students get used to using whiteboards and see their value, they may use them spontaneously any time they need to work out an idea. Early on, however, it is helpful to give them very concrete assignments where it is clear what they are supposed to write on the whiteboard. For example, give students a problem to solve and ask them to show their work on the whiteboard, or ask them to write their predictions on the whiteboard before doing an experiment. If students are afraid of making mistakes, try Kelly O’Shea’s Mistake Game.
- How do I get students to provide clear, organized whiteboards that other students can understand? Often a gentle suggestion is enough to get students to better organize their whiteboards. Questions like “I’m having a hard time understanding where you started. Can you make some indication of your steps on the board?” or “Why don’t use a different color for your work with the second ball?” will help remind students to pay attention to how they are presenting their work. If you have a classroom discussion about what makes a good whiteboard (see below), referencing the class norms that the students helped establish may also serve as a reminder to students to write big, use colors, etc.
- What if students copy from each others' whiteboards rather than thinking through the problem for themselves? If you consistently create a classroom culture that emphasizes the process of thinking through ideas rather than getting the right answer, this shouldn’t be a problem past the first few weeks of class. Some approaches that can help address this problem early in the term include assigning each group a slightly different problem (see Gallery Walk described above), and using horizontal whiteboards that are more difficult to see from across the room.
- What if students don't have productive conversations about their whiteboards? Ideally, whiteboards should provide an opportunity for students to make their ideas visible and engage in lively discussions of these ideas. The best way to ensure that students can engage productively with whiteboards is to ensure that they have sufficiently interesting and challenging problems to discuss. Rote plug and chug problems or problems that are so difficult that students don’t know where to start are not likely to promote rich conversations. According to the Composing Science project, good whiteboard problems should involve phenomena for which students have: various possible representations, interesting data to help further develop a model, and/or competing ideas.
- What if one student dominates the discussion or monopolizes the whiteboard, so that only his or her ideas, rather than those of the whole group, get recorded? Here are a few ways to prevent one student from dominating:
- Make sure that each student has a pen and encourage everyone to contribute to the writing together. As discussed in our recommendation on choosing whiteboards, this is easier to do with a portable whiteboard placed horizontally on a table between the students so that everyone can easily reach it.
- Have only one student write on the board at a time (if the whiteboards are vertical, this may be necessary for logistical reasons), but use a process for incorporating ideas from other students. For example, assign each student in the group to a role and rotate roles regularly, so that every student has a chance to participate in multiple ways.
- Put the students who have participated the least in creating the board in charge of presenting the board to the class. This requires those with the markers to slow down and explain what they are doing to others, and often those who are not participating will become more engaged as they do not want to be the sole presenters of their whiteboard.
- Require that each student present a different aspect of the whiteboard (i.e., one student can introduce the problem to the class, one student can present the force diagrams, another the equations, etc.)
- What if students are initially reluctant to critique each other’s whiteboards? Reluctance to critique or ask questions of each other may come from two different sources: (1) a lack of knowledge of how to productively critique another student’s work, and (2) a fear that criticism may be hurtful. To address (1), you can model the kinds of questions one can ask about a peer’s whiteboard, as in a “mock lab meeting” or a “master class” (see above), or provide a structured environment with prompting questions to get them started. For example, you can start a whole-class discussion of whiteboards by putting all the whiteboards in the front of the room where they can easily be compared, and ask students to compare them. The Composing Science project suggests the following prompting questions: “Do the groups agree? How does one group’s data inform another group’s findings? If models differ, are they consistent with one another or not? If not, how can we come to consensus?” In University Modeling Instruction, there is a focus on consistency checks within the model (i.e. Is your force diagram consistent with your equations, which are consistent with your observations?). A consistency focus helps address (1) by providing students a few "go to" places for critiques - are their representations consistent, is it consistent with my answer, is it consistent with real world observations? And it helps (2) because the language of the discussion goes from "You/your ideas/your answer is wrong" to "This aspect of your solution seems inconsistent with the rest". Another way to address (2) is to create a safe space for questions, feedback, and mistakes, by giving frequent reminders that it’s OK to disagree but not OK to be rude or insulting, and to politely call students out if they do make inappropriate comments.
- Since whiteboard writing is impermanent, will students have a good record of what they did that they can come back to outside of class? Taking photos of whiteboards is a great way to address this challenge, especially since most students have smartphones these days. Taking several photos as the whiteboard progresses helps track the evolution of ideas. You can ask students to take photos of their own whiteboards and those of other students, ask teaching assistants or learning assistants to do it, or do it yourself. Many instructors post whiteboard photos to a course management system or private Flickr account so that students can go back and look at them later.
- What if some groups complete their whiteboard problems much faster or slower than other groups? Learning to pace themselves appropriately is an important skill that may take guidance and practice for students to learn. You can support students in developing this skill by always giving them a specific time by which they should be done with their problem and ready to check in. Check in with as many groups as you can to make sure that they are making progress and not going down an unproductive rabbit hole. Let students work until most groups have finished working. For groups that finish early, have a follow-up question on hand that allows them to explore the problem more deeply. For groups that don't finish by the time most of the class has finished and it is time to move on, be sure to have a wrap-up with the whole class (see above for techniques for presenting the solution) so that all groups can still benefit from seeing a fully worked out solution.
- How will I be cover everything I need to cover if we spend so much class time on group work? See our recommendation on Arguments for Skeptical Colleagues for answers to this and other general questions about research-based teaching in physics.
How to have a whiteboard meeting about whiteboards: What makes a good whiteboard?
When whiteboarding becomes a central activity in the classroom (like in Modeling Instruction), the whiteboards themselves become a centralized record of what was learned in that activity and in many cases stand in place of class notes. Helping students create organized, understable whiteboards is then imperative for both their peers who need to read their boards in the discussions and for themselves as they look back at their work later in the term. One way to do this is to have an explicit discussion about what makes a good whiteboard and have students establish classroom norms for their whiteboarding, preferably at the very beginning of the term. As the instructor, you can ask students to explicitly make a whiteboard about what are good qualities to have in a whiteboard presentation or you can ask it as a leading question in a discussion of some other topic. Some qualities to emphasize include:
- Write BIG so that others across the room/discussion can see your work
- Use colors to emphasize important points and distinguish between the different parts of the problem
- Use multiple representations - often having a picture, equations, and a graph can help others understand your work better than just a set of equations
- Organize the whiteboard so others can follow your work - while problem solving is not often linear, it is immensely helpful to have some organization, labels or arrows so someone one else can tell where you started and what step you went to next
- Label the problem (and the worksheet it comes from) so you can find the problem again if needed.
Resources to learn more about whiteboarding
- The $2 Interactive Whiteboard – a blog post by high school teacher Frank Noschese describing the benefits of whiteboards over more expensive technology
- Whiteboarding - A blog post by high school teacher Kelly O’Shea with description of several novel approaches to whiteboarding that she uses in her classroom, including the Whiteboard Mistake Game, Monk Whiteboarding, Whiteboard Face-Off, and Whiteboard Speed Dating
- Whiteboarding: a learning process - An overview of whiteboarding from Don Yost (2-page article, 2003)
- Whiteboarding & Socratic dialogues: Questions & answers, Carl J. Wenning, Journal of Physics Teacher Education Online 3(1), 3-10 (2005).
- Whiteboarding in Paradigms in Physics - The Paradigms wiki is available to the public.
- What kind of whiteboards should I use? - A PhysPort expert recommendation discussing discusses the questions you should ask when choosing whiteboards, the advantages and disadvantages of each type of whiteboard, product suggestions for markers and whiteboards, and the advantages of whiteboards over other collaboration tools
- Educational Benefits – An overview of the benefits of whiteboarding from Whiteboards USA
- Socratic Dialogs in the Classroom – Suggestions for implementation of whiteboarding from Whiteboards USA
Acknowledgments: The authors thank Katie Foote, Alexis Knaub, Melissa Dancy, Charles Henderson, Bob Beichner, Mary Bridget Kustuch, and Leslie Atkins Elliott for feedback and contributions to this recommendation.
Cover image ©Stephanie Schulz/ or Chandler Prude – Texas State University CC-BY Icons ©Daryl McPadden CC-BY
 Add a Comment